

Here, we will examine the technical details of converting LaTeX to HTML, and how to add that capability to an existing project that does not use the template. If you are already using the configuration set up by the template, you can safely ignore this article.
This is an excerpt from Better Books with LaTeX, the Agile Way.
TeX4ht Configuration
Here, we will examine the technical details of converting LaTeX to HTML, and how to add that capability to an existing project that does not use the template. If you are already using the configuration set up by the template, you can safely ignore this chapter.
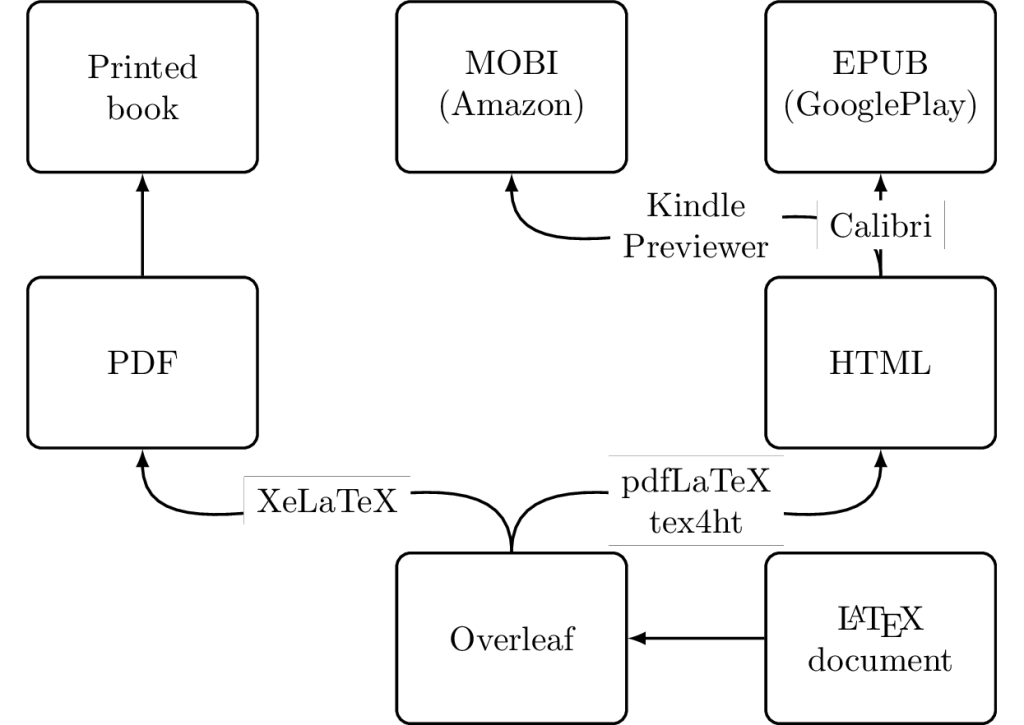
To convert LaTeX to HTML, we need an additional compiler, TeX4ht, which works only with pdfLaTeX. If you are using XeLaTeX (or other LaTeX compilers) for your project, you might run into some problems when switching to pdfLaTeX. You can stay compatible with both compilers by using the conditional \ifxetex statement.
On the Overleaf platform, no separate installation for TeX4ht is needed. All you need to do is include it by adding a file named latexmkrc in the main directory (and thus overriding the latexmkrc provided by Overleaf by default) of your project and adding a configuration file.
Latexmk ⋅ Latexmk is the build tool Overleaf uses to automatically build your LaTeX project. The configuration file latexmkrc can be used to override build settings and configure compilers for a different output format (like using TeX4ht to generate HTML output in addition to generating a PDF).
First, let us create the latexmkrc file in the main directory of your project and insert this code (depending on your project, if you are not using the template, you might need additional settings from https://www.overleaf.com/help/216-how-does-overleaf-compile-my-project):
$pdflatex = "rm tikz-cache/*.pdf; pdflatex -shell-escape -synctex=1 %O %S; htlatex %S \"htlatex/htlatex.cfg,MyFonts,NoFonts\" \"\" \"\" -shell-escape > output.txt";
END {system(’zip -r allfiles.zip . -x *.cache*’);}
This creates a hook in the compilation chain of LaTeX (LaTeX calls $pdflatex at the end of the compilation). All this does is clear the cache, call pdflatex before calling htlatex, giving you a PDF output (and compilation of TikZ images) in addition to the HTML output. It also writes the output of the compilation of htlatex to a new file called output.txt to be used for debugging. At the end, it zips all the files of your project into the allfiles.zip for later download. You can download the output files (clicking on the Logs and output files icon at the top of the right window, scrolling all the way down to Other logs & files, and selecting the previously created allfiles.zip).
Converting that HTML file into a real e-book format like MOBI or EPUB takes some extra effort as we need to adjust the settings, take care of the table of contents, add a cover, and optimize our images.
HTML Output Formatting
Unfortunately, TeX4ht cannot do a 1:1 conversion simply because printed books are based on pages while HTML documents and e-books are continuous texts. Also, formatting, spacing, and images are handled differently, so we need to configure this separately. In the listing above, you can see a reference to htlatex.cfg—that is where the TeX4ht configuration resides:
\Preamble{xhtml}
\Configure{VERSION}{}
\Configure{DOCTYPE}{\HCode{<!DOCTYPE html>\Hnewline}}
\Configure{HTML}{\HCode{<html>\Hnewline}}{\HCode{\Hnewline</html>}}
\Configure{@HEAD}{\HCode{<!-- for beautifying --><link rel="stylesheet" type="text/css" href="site.css" />\Hnewline}}
% Translate \textbf, \textit and \texttt directives into <strong>, <em> and <code>
\Configure{emph}{\ifvmode\ShowPar\fi\HCode{<em>}}{\HCode{</em>}}
\Configure{textbf}{\ifvmode\ShowPar\fi\HCode{<strong>}}{\HCode{</strong>}}
\Configure{textit}{\ifvmode\ShowPar\fi\HCode{<em>}}{\HCode{</em>}}
\Configure{texttt}{\ifvmode\ShowPar\fi\HCode{<code>}}{\HCode{</code>}}
\Configure{textsc}{\ifvmode\ShowPar\fi\HCode{<span class="sc">}}{\HCode{</span>}}
% Translate verbatim and lstlisting blocks into <pre> elements
\ConfigureEnv{verbatim}{\HCode{<pre>}}{\HCode{</pre>}}{}{}
\ConfigureEnv{lstlisting}{\HCode{<pre>}}{\HCode{</pre>}}{}{}
\ConfigureEnv{minipage}{\ifvmode\IgnorePar\fi\HCode{<div class="minipage">}}{\ifvmode\IgnorePar\fi\HCode{</div>\Hnewline}}{}{}%
% Do not set ‘indent‘/‘noindent‘ classes on paragraphs
\Configure{HtmlPar}
{\EndP\Tg<p>}
{\EndP\Tg<p>}
{\HCode{</p>\Hnewline}}
{\HCode{</p>\Hnewline}}
\begin{document}
\EndPreamble
What the file does is configure the mapping between LaTeX and HTML. If you are familiar with HTML, you see that you can configure the contents of the output HTML file with the htlatex.cfg file. It starts with setting up the HTML header and then configures how individual LaTeX commands (\emph, \textbf, \textit, …) should be translated into HTML. For example, text formatted in italics (\textit) is translated into HTML by using the emphasis HTML tag (¡em¿). The \HCode command directly inserts HTML commands in the output file and can also be used in the regular LaTeX files. For example, you can use
\HCode{<hr style="clear: both" />}
to directly add a vertical line into the HTML output file and thus the e-book.
CSS ⋅ CSS files determine the final design and appearance of a website (or e-book).
Also, in the htlatex.cfg file, the site.css file is referenced. This can be adjusted according to your needs, although in my experience, some of the following settings work nicely for Kindle e-books:
1. You might want to adapt the sizes of the chapter title and section title fonts:
.chapterHead { font-size: 1.5em; margin-top: 0.83em; margin-bottom: 0.83em; font-weight: bold; text-align: left; }
.sectionHead { font-size: 1.17em; margin-top: 1em; margin-bottom: 1em; font-weight: bold; }
.subsectionHead { margin-top: 1.33em; margin-bottom: 1.33em; font-weight: bold; }
.subsubsectionHead { font-size: 0.83em; margin-top: 1.67em; margin-bottom: 1.67em; font-weight: bold; }
2. In Kindle e-books, new paragraphs have indents on the first line. If you do not like that, this is the workaround:
p { margin-top: 1em; margin-bottom: 1em; text-indent: 0.01em; }
3. One way to highlight a quotation:
.quotation { margin: 0.25em 0; padding: 0.35em 40px; line-height: 1.45; position: relative; color: #383838; }
.quotation:before { display: block; padding-left: 10px; content: "\201C"; font-size: 80px; position: absolute; left: -15px; top: -20px; color: #7a7a7a; }
.quotation cite { color: #999999; font-size: 14px; display: block; margin-top: 5px; }
.quotation cite:before { content: "\2014 \2009"; }
div.quotation { width: auto; }
4. Add support for small capitals:
.sc { font-variant: small-caps; }
5. Print description list elements in bold:
dt.description { font-weight: bold; }


