A simple way of writing books in LaTeX is using Overleaf and our template. In previous articles, we have walked through the whole “build chain” of creating documents. In this article, we go through each file of the template and give you a “to do” list of items you can work on one by one—from the title to the appendix.
This is an excerpt from Better Books with LaTeX, the Agile Way.
Previously, we have covered the main, front, and the back chapter folders. Now we will discuss those folders again in more detail and go through the remaining folders. This will help you to know where the configuration for each part of the template can be found and allow you to make changes.
Template Library Files
Let us first focus on the lib directory. There, each file is a set of new commands or configurations to set up the style and contents of your book.
Packages File
A packages file is simply a LaTeX file linking to a number of other LaTeX files or containing additional functionality not provided in the default LaTeX configuration. To import a package in LaTeX, you simply use the \usepackage command before the \begin{document} command. In the template, the lib/packages.tex file loads all the other files in the lib directory and also loads some additional packages, depending on the output format.
The first two commands load the nag package to provide additional warnings if you are using outdated or invalid packages and expand the output of error messages (\errorcontextlines 1000) in the log file to help you fix issues quickly.
The ifxetex package loads a small script that we can use to check whether the target platform is a printed PDF (with XeLaTeX) or an HTML file (with pdfLaTeX). It follows the basic format of:
\ifxetex{} (executed if XeLaTeX is used) \else{} (executed if pdfLaTeX is used) \fi{}
Think of \ifxetex{} as the main junction between the e-book (the HTML file output using pdfLaTeX) and the print book (the PDF file output using XeLaTeX).
Next are several packages and configurations specific to either of those platforms. The adjustbox packages adjust figures to fit onto a page—a feature needed only for the printed PDF as e-book readers automatically adjust graphics depending on the screen resolution. The psvectorian package allows us to add curly horizontal lines at the end of sections and chapters—a feature not supported by e-books.
TeX4ht ⋅ TeX4ht is a tool to translate LaTeX code into an HTML document.
The next command, \hrule, is not supported by TeX4ht, so we create a specific command, \myrule, and translate it into an HTML <hr /> command correspondingly. For the em dash, we need to add spaces (even if it is just 0) left and right of it to allow for line breaks. For the HTML output, we simply use the ASCII code for the em dash (#8212;).
At the end of the file, all relevant packages of the lib directory are loaded, so we need only to include lib/packages.tex to load the entire configuration. On the following pages, I will discuss each package.
Language Selector
In an Overleaf project that is based on the template, you can select the language by changing the parameter of the babel package in output.tex. In the file, either the command \babelDE or \babelEN gets activated by the command \usepackage[ngerman]{babel} or \usepackage[american]{babel}, respectively. The command sets \languagename either to “ngerman” or “american.” In lib/languageselector.tex, the new command \babelDE{content} checks whether “ngerman” is set, and then displays the content. If it is not set, nothing is displayed. Likewise with the \babelEN{content} command, resulting in only one of the languages being displayed. The first use of this command can be seen at the end of the file, where we overwrite the naming of the table of contents depending on the language we have selected.
If you want to add a different language, for example, Spanish, replace “american” with “spanish” in output.tex (\usepackage[spanish]{babel}). Next, add the following commands in lib/languageselector.tex and you are ready to use \babelES as a command in your text.
\newcommand{\babelES}[1]{\ifnum\pdfstrcmp{\languagename}{spanish}=0 {#1}\fi}
\babelES{\renewcommand{\contentsname}{Contenido}}
Bibliography
In lib/bibliography.tex, the bibliography feature is added to the document and (due to compatibility issues) either loads biblatex or natbib depending on whether you use XeLaTeX or pdfLaTeX. It also loads the actual bibliography file from the bibliography directory, depending on the language you have selected previously. The parameters of loading biblatex determine whether cited titles should be added to the index automatically (“indexing=cite”) and what citations look like. There are numerous possible combinations of the author name, the year of publication, and the title, each with different degrees of detail and verbosity. The setting authortitle in my template replaces citations with the author name followed by the title. Without the setting, the default would be a simple number that is referenced again at the back of the book in the bibliography.
At the end, the file also loads the nameref library. With it, you can reference the label of a chapter or section and get the chapter or section title in return. Instead of just referencing an abstract chapter number, adding the title helps the reader to know what you are talking about. Any changes to the referenced chapter or section title are automatically synchronized. For example, look at this code:
\chapter{My First Chapter}\label{c1_myfirstchapter:sec}
Yesterday, I bought a car.
\chapter{My Second Chapter}\label{c2_mysecondchapter:sec}
Chapter ‘‘My First Chapter’’ discussed buying a car.
If we changed the chapter title “My First Chapter” to “How I Bought My Car,” we would have to update the reference in the second chapter. With the \nameref{} command, this is no longer necessary:
\chapter{How I Bought My Car}\label{c1_myfirstchapter:sec}
Yesterday, I bought a car.
\chapter{My Second Chapter}\label{c2_mysecondchapter:sec}
Chapter~\nameref{c1_mychapter:sec} discussed buying a car.
Book Format
Next is lib/bookformat.tex. The first thing you notice is the long list of \usepackage commands with the one marked with 5.25” x 8” uncommented. Here is your choice of how large your book should be. This applies only to a printed version of your book. For e-books, the size of your book is determined by the device your reader will use.
\usepackage[paperwidth=13.34cm, paperheight=20.32cm, inner=0.80in, outer=0.3in, top=0.7in, bottom=0.5in]{geometry} % 5.25’’ x 8’’
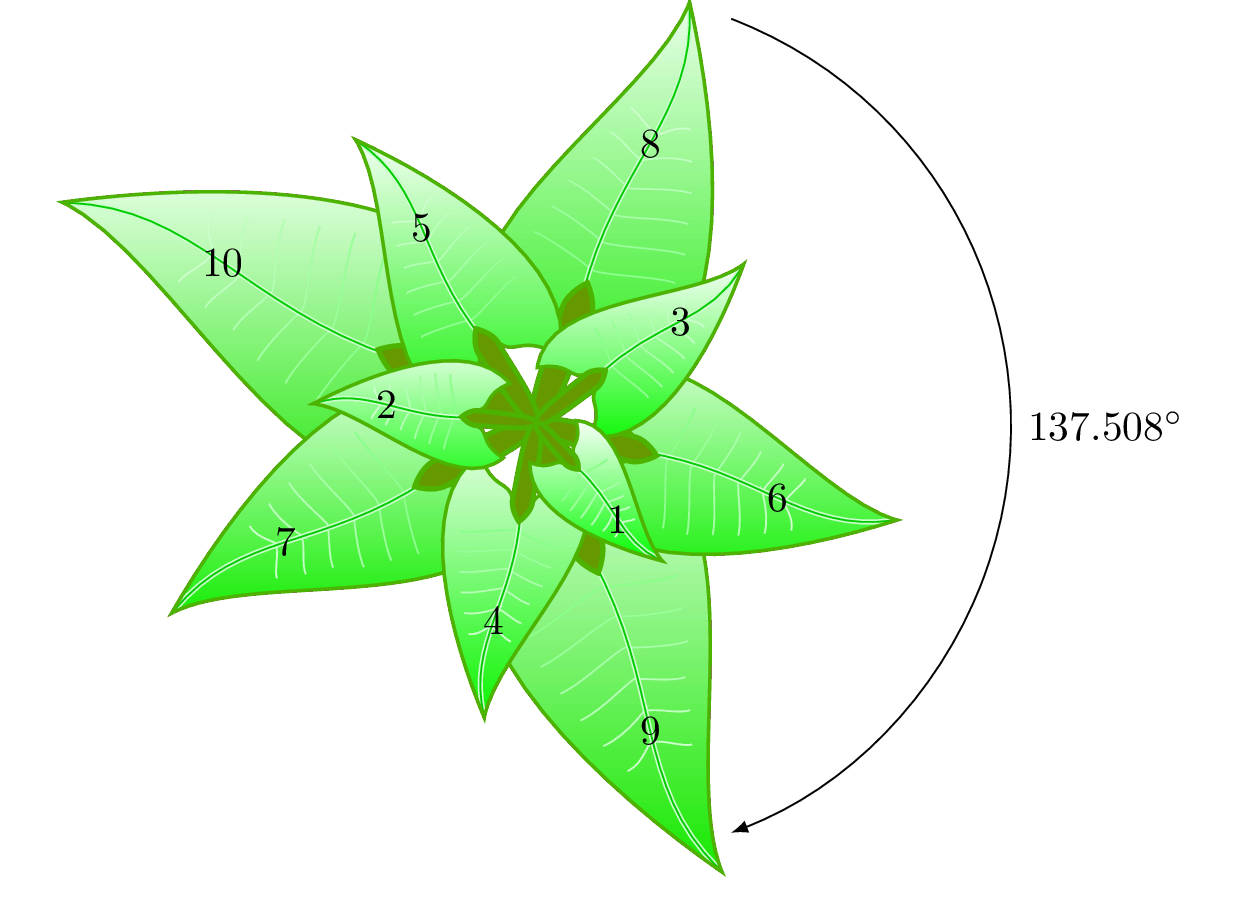
Did you know? Why choose 5 x 8? Ratios like 5 x 8 are found throughout nature. We find them appealing because our perception is “calibrated” to find objects displaying this particular ratio. Why? In nature, the fundamental problem for plants is to get as much sunlight as possible. If the leaves are arranged according to a regular pattern, such as “Leaf / quarter-turn / leaf / quarter-turn, …” the leaves will overshadow one another. The challenge is to find an angle of rotation which can be continuously repeated so that no two leaves grow directly above one another (see Figure 17.1). Nature’s solution is using a Fibonacci number sequence (1, 1, 2, 3, 5, 8, 13, 21, …) to calculate the “golden ratio” (5/3, 8/5, 13/8, 21/13, …). → Read more in Philosophy for Heroes: Knowledge [Lode, 2016]
Personally, I like 5.25” x 8” but it is totally up to you. Look at your personal library (and take a ruler) and check out the different formats. Besides personal preference, the only thing to keep in mind is that smaller formats lead to more pages if you do not also reduce the font size (which is not recommended!). Amazon KDP supports all those formats, but if you decide to have the PDF printed by your local printer, first check which formats your local printer supports, otherwise you might have to do some redesigning.
Looking at the \usepackage[…]{geometry} command itself, you see the self-explanatory paperwidth and paperheight parameters, as well as four parameters to determine the space between the margins of the book and your text. Instead of parameters that determine left and right margins, you see the parameters inner and outer. Given the way paperback books are bound, the inner margin needs to be significantly larger, otherwise the reader would have difficulties reading the book. Also, printers are not 100% accurate, so you need to keep some safe space to account for printing errors.
The parameters as defined in the file work nicely for my books. Feel free to experiment with different settings, but make sure you keep them within the range the printing company (be it Amazon or another provider) has defined.
Fonts
If you want to adapt the typography, lib/fonts.tex is the place to look. It consists of:
- Little tweaks for footnotes,
- Line height for listings,
- Space between paragraphs and paragraph indentation,
- Font sizes for captions and the index,
- Font of URLs,
- Background color and font size of listings,
- Typographical tweaks (microtype, lmodern),
- The selection of the font (libertine), and
- A command that inserts blank pages.
The tweaks are universally recommended, although feel free to select a different font instead of libertine. As the typography is under the control of the specific device when reading an e-book, this applies to only the printable PDF, not the HTML (and thus e-book) output.
The \sloppy command is optional; it reduces the readability of some lines, but it ensures that no lines go beyond the left or right border (something that makes printing the book impossible). For further optimization, you could (after having finished the book using the sloppy command) replace it with the \fussy and manually fix any issues with text going beyond the border. Both commands change parameters of how to stretch spaces between words and how to handle hyphenation.
Chapter Design
For ease of use, you can use the command:
\begin{chapterpage}{title}{label}…\end{chapterpage}
which is loaded from lib/chapterpage.tex. It sets up the style of the chapter page, as well as the following blank page.
The actual design of the chapter page for the print version is changed in the file lib/chapterbox.tex. It replaces the standard chapter design and uses a full page with a border and the chapter title in large letters.
To reset the chapter page design to the default settings (for example, for all back matter chapters) with a simple headline with the chapter title and a horizontal line, use either \input{lib/chapterfont.tex} or \chapter instead of \begin{chapterpage}.
Header and Footer
In lib/headerfooter.tex, you can edit the style and content of the header and footer. The command:
\ihead[\headmark]{\headmark}\ohead{\pagemark}
puts the chapter or section title to the inside and the page numbers to the outside of a page. Whether left or right is “inside” depends on whether it is an odd or even page. If you are working on an e-book, you can safely ignore this command because pages of an e-book have no header, footer, or page number.
The next command, \automark[section]{chapter}, lets the title in the header alternate between the chapter title and section title. If you do not want the section to show up in the header, replace “chapter” with “section.” The third command redefines \headfont and causes the heading to be in small capitals and italics. Finally, the naming of the chapter is redefined, setting it to “Chapter X name of the chapter” without adding a period after the chapter number.
TikZ Initialization
TikZ ⋅ TikZ is a vector-based drawing language with which you can draw diagrams, charts, tables, fractals, etc. in high resolution using minimal space.
In lib/inittikz.tex, the TikZ graphics system is loaded. Creating graphics in TikZ goes beyond the scope of this book, but we can help to get you started (see this article). For now, we will look only at the initialization.
After loading the basic TikZ packages (including the float package, which allows you to put a figure at a specific place in the text instead of having the LaTeX compiler decide), the style of various graphical elements is set up. For example, the text in the nodes of a diagram should have a small font, thick borders, and should be placed a certain distance from other nodes.
By default, TeX4ht exports TikZ graphics as vector graphic files (SVG files) and then loads them in the HTML file. Most modern browsers can show vector graphics, but the current e-book converters cannot. They work only with regular images, hence we need to change the behavior of TeX4ht. This is achieved by the code block at the end of the file. It causes all TikZ graphics to be exported into a cache folder, and then to be loaded again from there—as opposed to directly embedded into the PDF as vector graphics.
Long story short, we have to override the tikzpicture command to produce an external PNG file and load that in the HTML file. The PNG files are stored in the tikz-cache/ folder. Their resolution can be adapted by changing the density parameter value of the convert command.
Let us look at the details:
- -extent 1245 This extends the transparent part of the graphic to 1,245 pixels. This means all converted TikZ vector graphics will have a width of 1,245 pixels.
- -gravity center If the image is smaller than 1,245 pixels, this centers the graphic in the middle of the extended file.
- -quality 100 Sets maximum compression for TikZ graphics. This reduces the file size, at the cost of an increased compile time.
- -density 300 Sets the output to 300 dots per inch. This affects the effective size in pixels of the generated graphic.
Table of Contents
Turning to the next file, lib/tableofcontents.tex, we now arrive at more intricate programming. For the table of contents in the e-book, we need to insert code directly into the HTML output file. So, we check whether the current compiler supports \HCode (only TeX4ht supports that), and insert <nav> commands to tell Amazon that what follows now is the table of contents.
For the PDF output, in the case that \HCode is undefined, the command \KOMAoptions{open=…} changes on which side (left or right) the new chapter begins. The template is configured to start chapters on the right side by default (by using the documentclass scrbook—we will discuss this later). For the table of contents, I have decided to let it start on the left (even) page so that the reader can see the full contents of the book in one view. With the following command \KOMAoptions{open=right}, the original setting is restored. Finally, the page needs to be cleared and reset with an empty page style in order to hide the header—we do not want any page numbers in the table of contents section itself. This is accomplished by the command \thispagestyle{empty}\pagestyle{empty}\clearpage.
Boxes
After finishing my first book, Philosophy for Heroes: Knowledge , I found that it needed additional layers of information to accommodate different types of readers. After considering various options, I decided to add summary (idea) boxes at the end of each section, additional examples, biographies, questions for the reader, and boxes that provide a preview of future books in a series.
Building these boxes is the task of lib/boxes.tex. This file contains graphical elements you can add throughout your book and adapt to your needs. Please note that the box icons are not included in the template; upload them on your own and uncomment the relevant lines in lib/boxes.tex.
\begin{lstlisting}…\end{lstlisting} In this environment, everything will be output as you wrote it. This is useful to print out code (like this paragraph) without having to replace all the slashes and braces. The \lstset command determines the formatting of the output, such as break lines at the end of the page, light gray background, indentation, and small font size.
\begin{problem}…\end{problem} For the print book, it creates a box with a question mark icon and the text “Question” at the top of the box. Use it at the beginning of a section to ask the reader a question that is answered in the text.
\begin{idea}…\end{idea} For the print book, it creates a box with a lightbulb icon and the text “Idea.” Use it to summarize the previous section and answer the question in the question box.
Example
\begin{example}…\end{example} Creates a box with a book and test tube icon and the text “Example.” Use it for examples that deepen the understanding of the topic in question, but could be safely skipped.
Biography —Name
\begin{biography}{Name}…\end{biography} Creates a box with a book and an identity card as an icon and the text “Biography.” Some readers want to know more about the people you are discussing in your book, while others want to skip that part. Creating a biography box will accommodate both types of readers. Note the additional parameter (the name of the person), use it like this: \begin{biography}{Alan Watts} Alan Watts was born in …\end{biography}.
Did you know?\begin{preview}{bibliography id} …\end{preview} Creates a box with an opened book as an icon and the text “Did you know?” at the top. When referencing your previous books (or giving a preview of your future books), you can use these boxes as additional promotional space. It gives the reader an interesting bit to read and might make him or her curious enough to buy or pre-order your next book. Notice the additional parameter (the name of the book), use it like this: \begin{preview}{BBWLtAW} In my previous book …\end{preview}. → Read more in Better Books with LaTeX the Agile Way [Lode, 2019]
Definition ⋅ \begin{definition}{Term}…\end{definition} creates an indented block of text with a black bar to the left (for the PDF output) and the given parameter (the name of the term) in bold and small capitals. This can be used for glossary items to precisely define a concept you have written about in your text.
\begin{quotation} …\end{quotation} Creates an intended block of text with a quotation mark graphic in front of it. It signals that this is a quotation from another author. You can use this throughout your book, but I would recommend putting it at the beginning of a section to set the theme or to bring up a particular question.
Finally, we need to display multiple columns in the glossary with lib/multicolbalance.tex.
\begin{multicols}{number of columns}…\end{multicols} Splits the text into several columns. This is the typical format of the glossary at the end of the book. Books with larger formats might use these throughout the book if necessary. The contents of the columns are balanced (as opposed to filling first the left column and then the right). For readability, the ideal number of columns is two.
Core Files
We already filled the folders main/, back/, front/, biographies/, examples/, ideas/, questions/, glossary/, and images/ in this article. We will discuss the remaining files for the HTML conversion in the css/ and htlatex/ folder, as well as the latexmkrc and pgfsys-tex4ht.def files (see this article). Let us now take a look at the core files of a LaTeX project in the root directory. There you can find the entry file that initializes the language settings (output.tex), and the main project file that binds everything together and provides the structure of the book (main.tex).
As pointed out above, in Overleaf, you can change the language of your project in output.tex. The parameters american or ngerman of the \usepackage{babel} command reflect this choice. Other than that, the following settings are configured:
- \documentclass[ …]{scrbook}. This sets the document class of your project to a book, introducing odd and even pages with extra space in the middle for the binding. The standard document class is book, using scrbook instead loads several additional commands (the KOMA scripts) which we will be using throughout the template. For detailed documentation of the KOMA script, check out https://www.ctan.org/pkg/koma-script. In the template, the pagesize is set to auto, and the bibliography is set to totocnumbered so that it shows up in the table of contents.
- \title{Title}. This sets the title of your LaTeX project. This title will not show up in the final document but is the name of the project listed in Overleaf.
- \hyphenation{…}. Here, you can enter custom hyphenations for fine-tuning. The packages xspace and hyphenat are required for it to work. Not every word is known to LaTeX, and the rules differ between, for example, British and American English. With the hyphenation command, you can enter the hyphenation for special cases yourself. For example, in the Oxford dictionary, “everywhere” is hyphenated as “ev-ery-where” but it might look odd in your text, so you can add \hyphenation{every-where} to tell LaTeX to hyphenate only in the middle. For additional words, simply add them into the bracket: \hyphenation{every-where ti-ger la-tex kit-ten}. You do not need to add a comma or semicolon to separate additional words, just put a space before each new word.
Once the language is set up, the entry file loads lib/packages.tex and then goes into the main file main.tex which is split into five parts:
- Preamble. For the PDF output, the index is initialized. E-books do not have indexes as they do not have fixed page numbers. Then, the document is started. Everything between \begin{document} and \end{document} is written to the output.
- Front matter. Front matter pages are numbered with Roman numerals (i, ii, iii, iv, ...) to set it apart from the main matter. The numbering begins on the title page (not the cover itself) with the command \frontmatter. The template is also set up to use only basic chapter title formatting (no fancy box) for all the chapters in the front matter. To hide page numbering on a certain page (for example, the title page), add \thispagestyle{empty} at the beginning of the page.We start with the half title page showing the title, and the title page with the book cover image when compiling it as a PDF. Then come the publisher, dedication, epigraph, and table of contents page. For the PDF version, we activate the chapterbox formatting to show fancy full-page chapter titles. Next, we show the foreword and the preface by the author.
- Main matter. For the main matter, we switch back to numeric page numbering and insert all the chapter and section files. This is where the bulk of your writing will be added. This is also the place where you can move around or remove individual sections. For example, if you do not want a page with book advertisements, simply put the comment symbol (%) in front of \input{back/advertisement} and it will no longer appear in the output. Remember to use a separate tex file for each individual chapter. If you copied your entire book into the main.tex file, organization would become difficult.
- Back matter. In the back matter, we show the reader how to proceed from here by advertising our other books and recommending additional books written by other authors. Next, we insert the author’s biography, as well as the story of how the book was created, giving the interested reader a look behind the curtain. We switch back to the basic chapter design and provide the reader with summaries of the boxes we used (question, idea, and glossary items), as well as a list of sources for the quotations (which we omitted in the text for better readability). Finally, the full bibliography is added.
- Appendix. The appendix provides the reader with the index (for the PDF output), a reminder to write a short review online, and farewell words.
Again, you are free to move sections around as you see fit or even disable individual parts by commenting them out (adding a percentage % sign in front of the line). As you organize your book, think about what the reader would expect in a particular location of the book. While especially the front and back matter are more or less superfluous parts of a book, they also tell a story and give the reader a context to better understand what you have written in the main part of the book, and why.
This concludes the discussion of the template. In the remaining chapters, we will proceed to discuss how to polish both the e-book and the print version for release, especially when it comes to graphics, and how to publish the book via specific platforms.
While we have tested the template together with this book several times, you will likely encounter an issue not discussed here. Creating a document in LaTeX is more complicated than in Word. Remember: If you encounter any error or have a question about LaTeX in the template, please do not hesitate to contact us and we will see what we can do!